C/S Platform

web platform
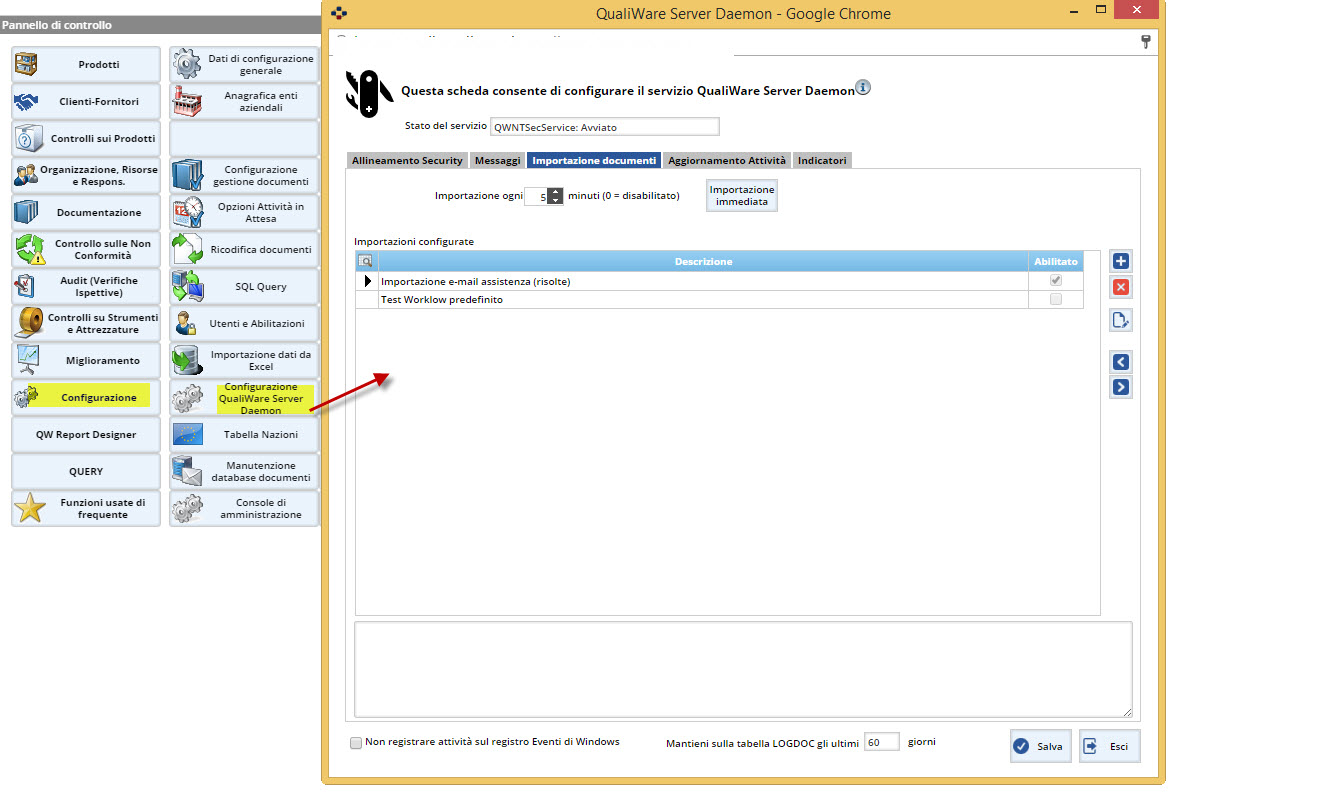
This form, which opens from the main button “Configuration“, manages the following specific functions:
- Security alignment
- sending email
- Import documents
- Pending activities Update
- Files monitor
- KPI indicators
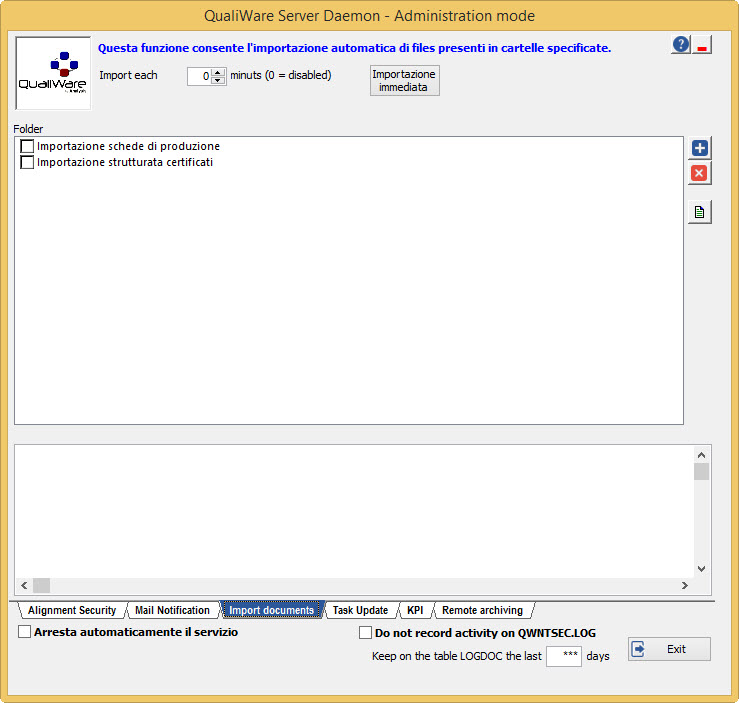
Such component can be installed on the server or in any case on a machine dedicated to perform network services, and that is able to access both the file server to the database server. The settings made in this tab are stored on the database, as well as recordings of the log , so be consulted centrally.
Similarly, also the recordings activity are recorded on the table “LOGDOC” of the first database configured, unless it is not checked (as it is by default) the box ” not record activities on QWNTSEC.LOG”;
to avoid the generation of a large files, in fact, suggests to disable “recording QWNTSEC.LOG” through the appropriate check.
QualiWare Server Daemon is designed to be run interactively. Although the installation program set the program to run automatically at logon, you can still configure and recommended the start as a service.
The activities of the service and any errors are documented in both the QWNTSEC.LOG file in the installation folder is on LOGDOC table of the first database configured.
The “Consultation Log QualiWare Server Daemon” present in the Client / Server version allows you to activate a query preset to examine the activity log.
the settings are also stored on the first database configured in QWAGG table.
the records relating to QualiWare Server Daemon are those containing the following values in the “Section” :
– “Settings” -> General Settings
– “ImportazioneDoc” -> Import documents
– “Reminders” -> Mailing
NOTE : As of release 2015.03b on QualiWare web platform is installed QualiWare service .NET Server Daemon (QWNTSECSERVICE.EXE), which replaces the traditional service QualiWare Server Daemon QWNTSEC.EXE, svolgendone the same activities.
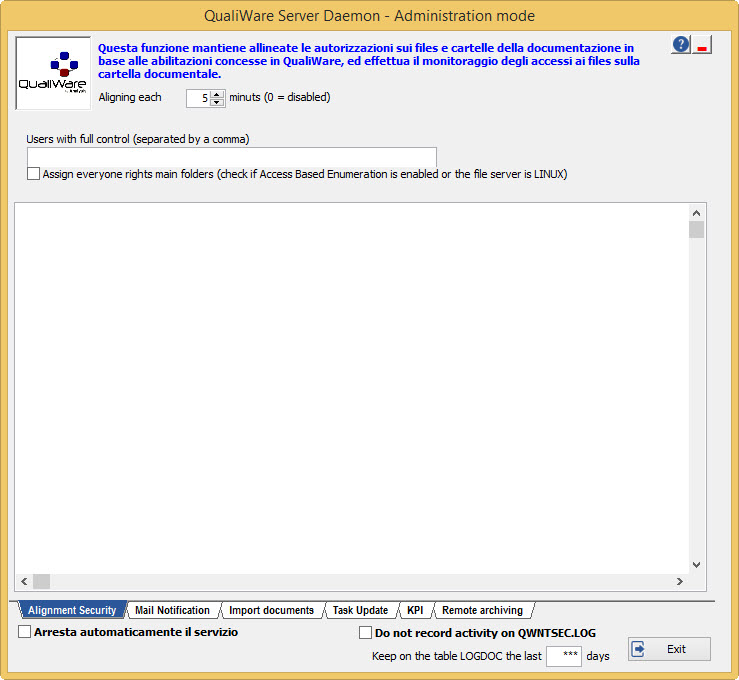
SECURITY ALIGNMENT
-
To launch the instant alignment, press the button “Instant Alignment”.
-
Configure the frequency of the alignment of permissions on files and folders on the server compared to authorizations granted in Documentation Management Configuration.
-
The check box “Automatically stop the service at […]“ specifies the services stop time, in order to obtain a “clean break”.
MAIL NOTIFICATION
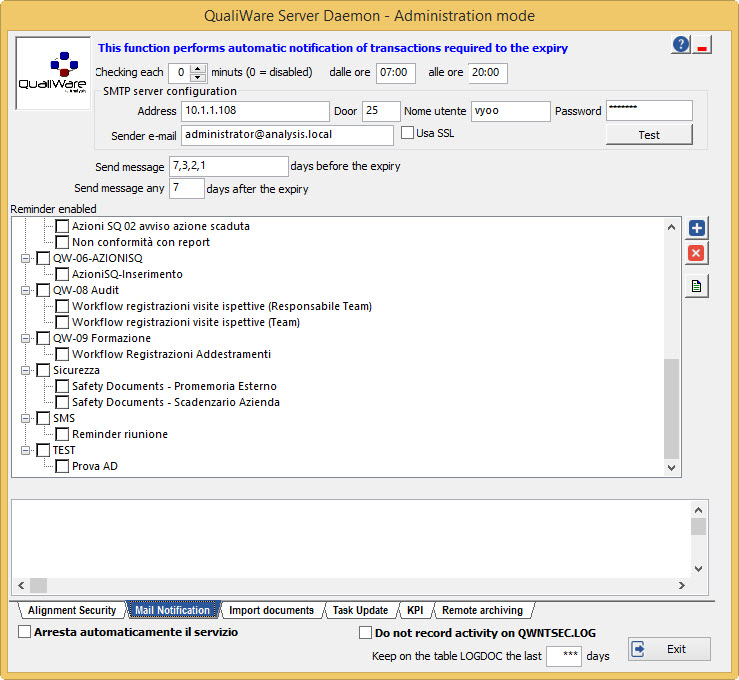
This feature enables you to specify how many days before the deadline and after how many days after the deadline a user should be warned automatically and via email.
- In the field “Checking each..min“ indicate the frequency of automatic control, specifying, in the time interval “from..to…“in which enable auditing.
- Leave it to zero if you want to disable, and then not to send automatic notification messages.
- Press the button “immediate control” to launch immediate control.
- Specify the SMTP server that allows sending e-mail.
- The address specified in the e-mail sender field must be an address to which the server acknowledges the relay.
- In the field “Send message..days before the expiry date“, specify how many days before deadline the message should be sent.
- In the field “Send message each..days after the expiry date” indicate after how many days after expiration, the user must continue to be notified automatically.
- In section Reminder enabled tick the categories for which enable automatic notification.
- With the
 button you can add a reminder for another category besides those already present; as with the button
  you can eliminate a category from the reminder.
 - The
 button allows you to manage the details of the reminder for each category: by pressing it, in fact, the following window will be opened.
Note: you can create, in the same reminder, more mail to the same recipient with different subjects.
Advanced management of automatic mail
This window pops up from the button ![]() of the Mail Notification tab of the QualiWare Server Daemon form.
of the Mail Notification tab of the QualiWare Server Daemon form.
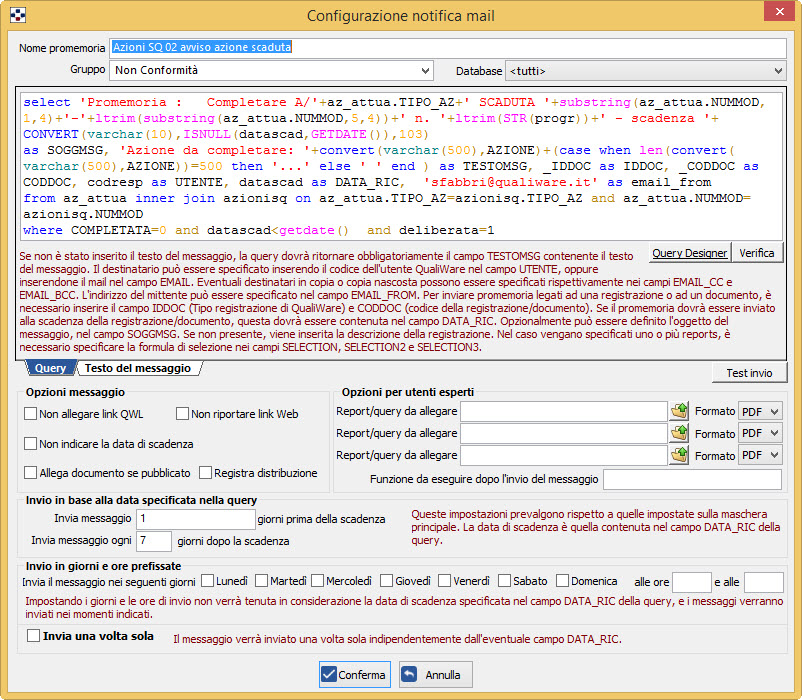
This window allows you to define additional reminders fully configurable through the specification of a query and a sending schedule:
- At the top, in the Reminder Name field, type the name of the category for which you want to configure the reminder.
- In the notes field Query should be written message configuration query for the category you want. The program offers syntax highlighting function (string and numerical constants, relational operators, comments).
Are also running the undo and redo functions. Follow the instructions below. NOTE In query, you can specify the field “ATTACHMENT_PATH” that contains the path of a file that will be attached to the message. Specifyng also the “ATTACHMENT_NAME” field you can define the name that the attachment should have (including extension). - In the field Group indicate the name of the group in which the reminder should appear in the list on the main form. If empty, the reminder appears in the Default group.
- In the Database field, you can specify the databases to which you want to apply the remainder. Must be specified if multiple databases are configured.
- The message options in the green box alows you to define all parameters of the reminder.
- In particular, you can attach apublished document to a reminder message, by checking the “Attach document if published”. In this case you can also make sure that the sending is recorded in the distribution list, by checking the box “Record distribution”. If it is not checked the field “Attach document if published” but the query returns the IDDOC and CODDOC references of a published document, the distribution is recorded anyway and, in that case will be attached the link QWL and the web link.
- By specifying the code of the user in the query field “USER”, you can have the distribution recorded in the user’s name, so that it is valid for access to the document.
- You can also specify up to 3 reports or queries whose output will be attached to the message. It is also possible to specify, for each report separately, the format, choosing among the options PDF, DOC and XLS:
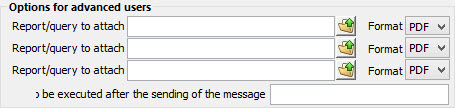
-
Not only that, you can also send queries exported in Excel involving either an excel template and also any parameters. These should be specified in the query that generates the messages in special columns which have exactly identical to the name of the parameter (including case sensitive).
- The text of the message tab opens a Notes field with HTML editor that lets you easily define the message text instead of in the query specification in the TESTOMSG field.
In addition to normal HTML formatting, you can refer to fields in the query itself by placing them with a notation of the type [%<field name>%]: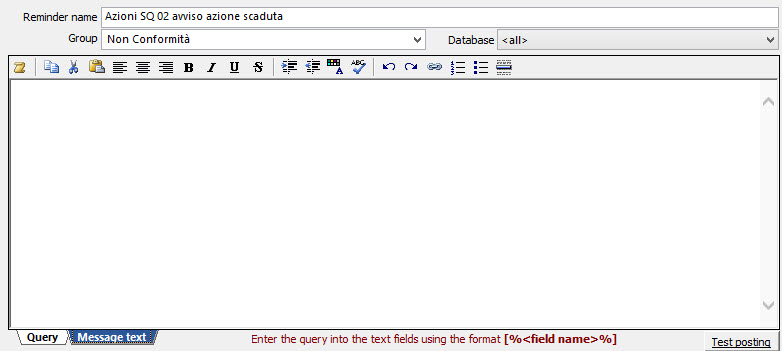
- Use the button “Send test” to perform a send simulation. Created messages are sent to the sender address.
- The box “Send once”, if checked, allows you to send the message once. The program will check that hasn’t been sent previously a message to the same recipients and with the same subject, and if so, will not resend the message.
This setting takes precedence over all other specifications about the timing (for days to the deadline or set times and days).
IMPORTING DOCUMENTS
Document Import service allows Automatic import in QualiWare document management of files in specified folders. For example you can use this function to automatically transpose within QualiWare incoming faxes.
The service carries out regular monitoring those folders, importing the files contained in them and deleting them after the import was successful. It is possible to specify, for each folder, the target category of files, numbering mode and also values for the various attributes of the document.
- Use the button to indicate the folder from which to import documents automatically. The button opens the folder definition form.
- Instead, use the button to cancel the automatic import from a specified folder.
Documents import configuration
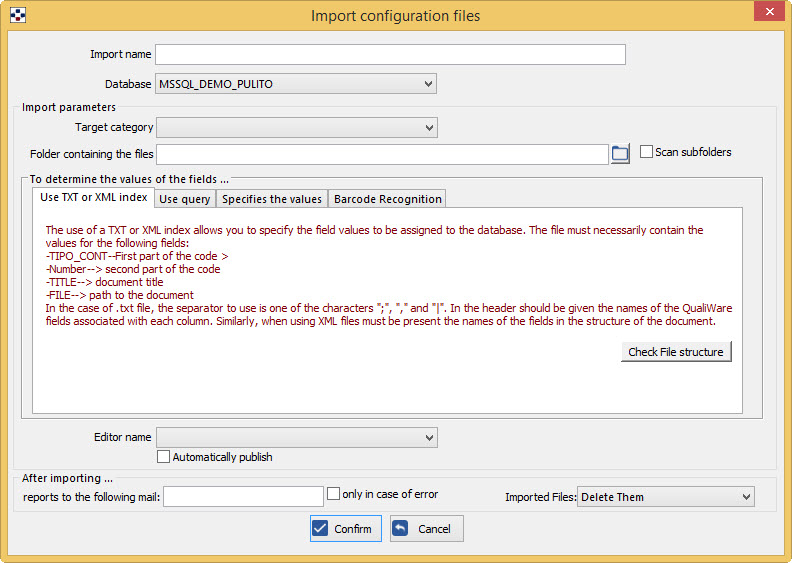
- Indicate the Targer category of imported documents. Use the arrow to open the list of categories of documents set.
- You can also import files from subfolders of the specified folder, by selecting the “Scan subfolders”. The file path is passed to the query in the PATH parameter.
- You can define default values for the category field: TIPO_CONT, NUMBER, TITLE, etc.:
- You can also launch the automatic publishing, by checking the box “Public automatically”.
- By ticking the check box “Run OCR for PDF , JPEG, TIFF and BMP files” you can set automatic OCR of documents, provided that the corresponding module is installed.
- It is also possible to define a person to send an alert message, if an error occurs.
- Finally, you can indicate what to do with imported files, choosing between the options .
Barcode recognition
The barcode option allows to recognize one or more barcodes present in the imported document, passing them to the query that determines the values of the fields.
NOTE Using this option requires the module QW-OCR.
PENDING ACTIVITIES UPDATE
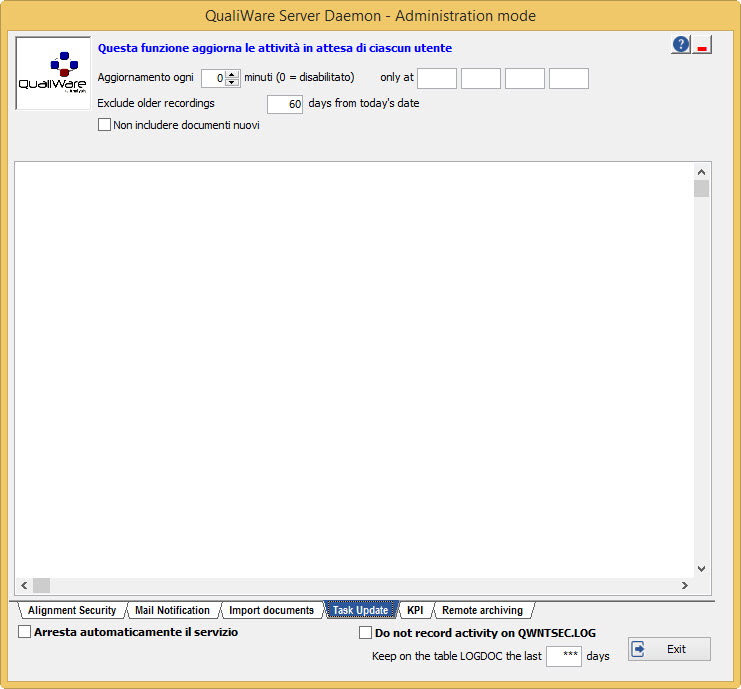
- Indicate in the field every how many minutes you want to automatically update the list of pending activities. Leaving it to zero, there will be no automatic upgrade, and you must run it manually from the pending activities panel with the button “Update”.
- Also specify the date before which the recordings are not required.
- You can include or not include new documents.
INDICATORS
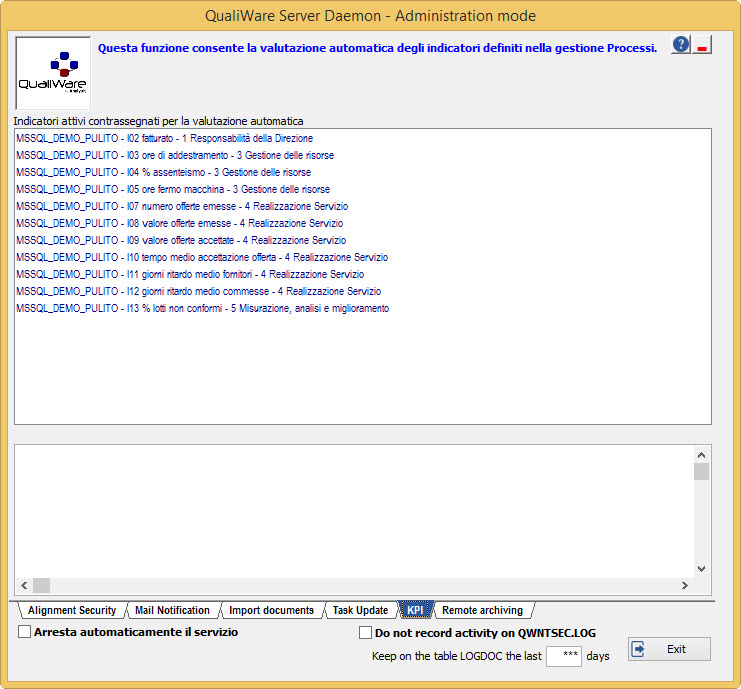
The configuration of the indicators to be evaluated with this mode is made through the Indicators of Process form.