Use this tab to record a lot of product entered (by supplier or by working outside) and the outcome of the test on the same. Can be registered more lots about an acceptance that has so many rows as there are lots of products entered and collected under the same Acceptance Report Numb. (managed in the “Acceptance Material Reports Management”).
The query, called “Row 1 of Acceptance’s Report” is shown in the figure:
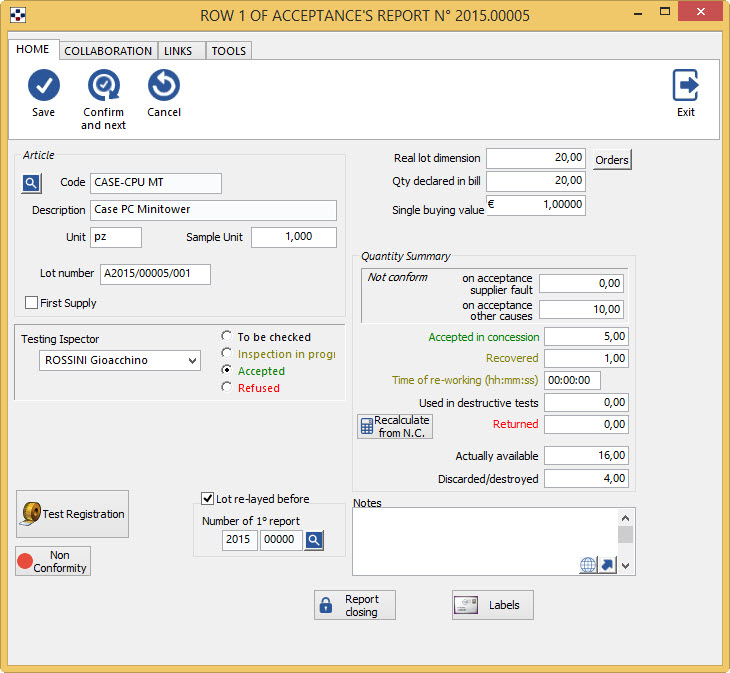
Its compilation consists in four phases:
COMPILING A REPORT OF ACCEPTANCE
PHASE I – DATA LOT
-
Invoke the article by inserting the Code or Description in the respective fields. Even in this case, to get a list of all articles in the specified provider in the first tab, you can use
 .
. -
If you want to use as a reference, the code attributed to the same supplier article, tick the Supplier Code and then type the code. The program automatically returns the internal code.
- If, after calling the code, it appears the message “product in free pass“, it means that that product refers to that supplier, the company has set up the automatic acceptance, without having to perform any checks if the assessment of the product code entered than ordered. In this case, simply fill in the section:

The testing Inspector, after checking the code declares Accepted the lot or, if your code does not match, the rejects, calling into question the Decision Responsibility.
- The fields relating to unit of meas. and Sample Unit will be automatically compiled, by copying the data from the board Registry data articles.
- Even the lot number will be shown with a specific number and unique for each lot, attributed by program: this number is the indication of the year preceded by the letter A (acceptance), the acceptance ratio number and a sequential number. The name of the lot but is editable by the user if he wants to identify it according to other criteria.
- The first supply is marked automatically for new products that come into the company for the first time.
- After calling the product, the cursor is automatically placed on the testing Inspector by the name of the user who is working, as long as they have permission to access and change to this particular recording quality.
- In Real lot dimension, highlighted in red type the quantity corresponding to the lot received. If it is different from the declared level, specify it in the field quantity declared in the bill .
- In purchasing unit value indicate the actual cost of a unit of product.
- In expected delivery date enter the date for which was provided for the delivery of material by the supplier.
Then the cursor will move directly on the button “Test Rgistration” by pressing which you will pass to the third step of acceptance report compiling : the Test registration Acceptance Report
Once you have completed the registration of testing, we return to the board “Row N of Acceptance’s Report”, to summarize the outcome of the tests and the amounts actually available.
PHASE II – DATA RELATED TO TEST RESULTS
- If all aspects of the testing have been accepted, in part on the testing Inspector, will appear automatically the “bullet” alongside the Accepted option and the Summary Amount does not conform will be all to 0.
- In the case where at least one of the aspects of testing has been REJECTED by the Testing Inspector, in the Decision-Responsible section , which automatically turns on, will must be indicated the decision about lot destination and the name who took the decision.
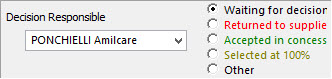
The decision may be:
- Return to supplier, if you decide to make immediately and in full the lot to the supplier;
- Accepted in concession, if the batch is accepted in its entirety despite the non-compliance found;
- Selected to the 100%, if the rejected lot is subjected at 100% selection for separate non conform units from those conform;
- Other, any other type of intervention, as a downgrade, a, etc.
PHASE III REGISTRATION OF ANY NONCONFORMITY
If there were scraps, you must specify the type of non-conformity presented and how many units. In particular, the operator may record non-conformity:
- with regard to testing samples three hypotheses:
- When registering at the same time as testing, before the decision of the Decision Responsible,
- following the decision of Decision Responsible to accept the lot in concession, in order to make the form non-conformities,
- following the decision of the person in charge of making the whole lot so he can make the form non-conformity and test report to send to the manufacturer together with the return lot;
- with regard to the whole lot: when the Decision Responsible has requested the selection at 100%.
To record the nonconformity, just press the button “Non-conformity”, which opens the card Insertion Non-conformity .
PHASE IV – SUMMARY OF TEST DATA
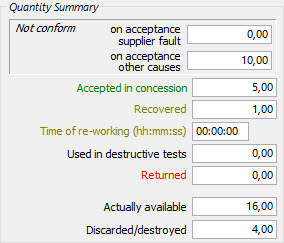
The amount actually available is calculated according to the following formula:
num.lot-Qty.Avail. = max (red.Qty, Qty.Supp.Acc + Qty.rec. Qty.Oth.Acct + Qty.destr.Test – Qty.rel.Acc.)
Where:
1) Qty.Avail. = Amount actually available
2) Num.lot = actual size of the lot
3) red.Qty = Surrender
4) Qty.Supp.Acc. = in acceptance caused by supplier
5) Qty.Oth.Acc = to accept other causes
6) Qty.destr.Test = used in destructive tests
7) Qty.rec = Recovered
8) Qty.rel.Acc. =in releasing Accepted
Uses the MAX function since it is assumed that the amount to be subtracted is always the largest value among the quantity made and discarded (obtained by the calculation shown in green just above).
If you enter non-conformities (as described above in Step 3), you see the button “Recalculate by N. C.”, pressing the button will update the summary Amount compared to non-conformities entered. If nonconformities are detected more than one, you will need to manually update the fields in Summary Amount, because automatically deduced values are doubled. Keep in mind however, that the recalculated data may not be meaningful, that will be good to check it out again and possibly correct it by hand.
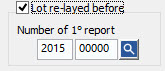
Finally tick the “Lot re-layed before” if it is a lot that had been made and that is being presented again by the supplier after the restoration of compliance. By ticking this box will automatically activated another field in which should be indicated and a number of Acceptance with which the lot was presented the first time.
If you need to fill in the Notes field, writing a quick comment.
Finally press “Report Closing ” to store the data, which will form the 1 Line of acceptance Report being compiled.Automatically release fields to build a new line and the title of the second tab will become 2 Line of acceptance.
A test Report closed can be reopened by any “Testing Inspector” or “Decision Responsible” regardless of the user who has handled (see under).
When you have entered all the rows of the acceptance, by pressing “exit” you will return to your Acceptance Material Reports Management, in which for each row in the column compiled QTY was the entered amount lot in column and State, the program will automatically insert the test outcome or decision status product:
![]()
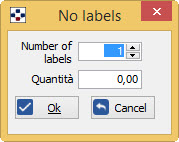
PRINTING LABELS FOR ACCEPTANCE
It is possible to print directly from any number of labels showing the test case and its outcome. Press the button “Labels”, which will open a window where you specify the number of labels you want and the amount of container, which will be printed on the label the same also in barcode:
REFERENCING AND EDITING DATA
- To invoke an acceptance Report already compiled, you must know the serial number of the report which concerns: in document number , type the number, then press <INVIO>: automatically builds the acceptance Report.
- To invoke the data relating to an article within the acceptance report, select it from the body of the document Acceptance report and press <INVIO>: opens the board line management.
- To Open a report that has already been closed – faculty that it is only to test or to the Inspector in charge of decision Responsible (regardless of whether they were their to write it), must click with the mouse on the inscription: “the document has been closed on 6/25/2004, Click here to reopen”
- To invoke the data relating to the management of variables and attributes for testing, press with the mouse button “registration of Trials”.
- To delete an article from an Acceptance report, select it in the body of the document, and then press “Delete Item” .Note: this function must be used with extreme caution, because the deleted document can no longer be recovered.
- To delete the entire document, select the relationship of acceptance to be deleted by calling the number of the document, and then press “delete” and confirm the deletion.