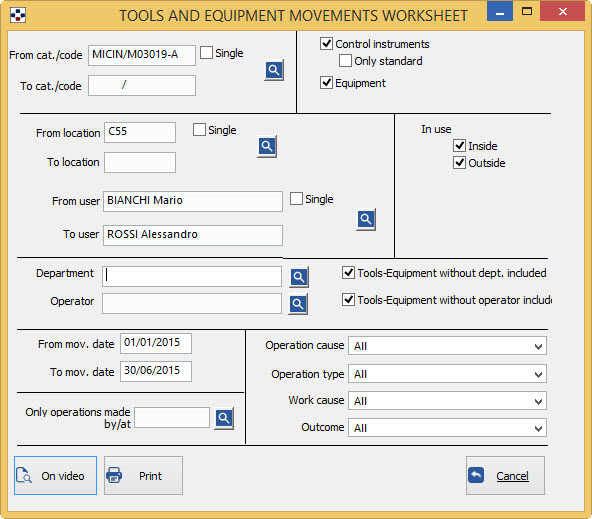
- Fill in the fields From cat/code, To cat/code, to select the code or the category of the instrument that interest you:
- to print the Movements Worksheet of all instruments, do not specify any code in the two fields.
- specify two different codes, to get the prospectus relating to movements within the range specified.
- If you do not specify the first code, will be printed on the statement of movements from the first list tool, up to the number specified in the second field; Conversely, specifying the first field and not the second, will be printed on the statement of movements from the specified tool, until the end of the archive.
- If you want the statement of movements of a single instrument, simply specify the required code in the first field and tick “Single”.
- The <F2> button or the button
 always opens the General list.
 - Fill in the fields From location/To location, to identify a range of data that you want to restrict the selection. If you do not want to use the filter, leave the fields blank. In this case, to open the list of locations used, press the button or use the <F2> button.
- Fill in the fields From user/to user:
- to have the press movements of instruments in use by any user, do not specify any code in the two fields.
- specify two different codes, to get the movements print of the instruments already in use by users within the specified range.
- If you do not specify the code will print first, the movements of the instruments in use at the first user in the list, up to the number specified in the second field; Conversely, specifying the first field and not the second, the movements will be printed starting tools than those in use at the user specified, until the last user in the list.
- If you want to print instead of the movements of the instruments in use by a single user, just specify the required code in the first field and tick “Single”.
- The <F2> button or the button always opens the list of potential users.
- It is possible to specify additional parameters to print targeted, by ticking the check boxes corresponding to the from which you want to focus your search:
- “Control instrum.“, “Only Standard”, “Equipment”: you can filter the entries of only control instruments (and, among these, only tools-sample), or of equipment;
- In use Inside/outside: you can filter only those used internally or used externally;
- Only oper. made by/at: you can filter the entries depending on the recipient (for use) or the revisioner (for interv.);
- “Operation cause”, “Operation type”, “Work cause”, “Outcome”: If you have defined (in special section) of configurable causal, you can filter the entries, for each causal entry (for example: only actions to blocking failures or only controls that have given positive results, etc.).
- In the field “Department/Operator” you can filter the selection for Department/Operator (with the eventual possibility on including list or not even strum / equip. not associated with a dep./op. in particular, using the checkbox to side).
- Fill in the fields from mov. date/to mov. date, according to the period that affects:
- not changing the date of the two fields, you’ll get the data prints from 1 January of the current year, until today.
- writing a date in both fields, you will have the information relative to the specified time span.
The “On video” button displays the print preview; from the preview window you can then print.
The “Print” button executes the print request.
The “Cancel” button cancel the print request and exits.
As for the buttons in the print preview, see the section.