The “Users and permissions” form has the function to manage the ratings for all people which use the program, so that each of them can act on data only within the limit of its functions and powers. This form is therefore a very important tool for the purposes of data security and control over utilization of the functions of the program by all users.
To share access permissions between various users, it is necessary to fill out the form for each user. The ability to fill out the card, however, is attributed only to the system administrator. All others see this form, so they know how are shared access permissions, but they cannot change it.
USERS DEFINITION
Allows you to define users of the program, and it appears as in the figure:
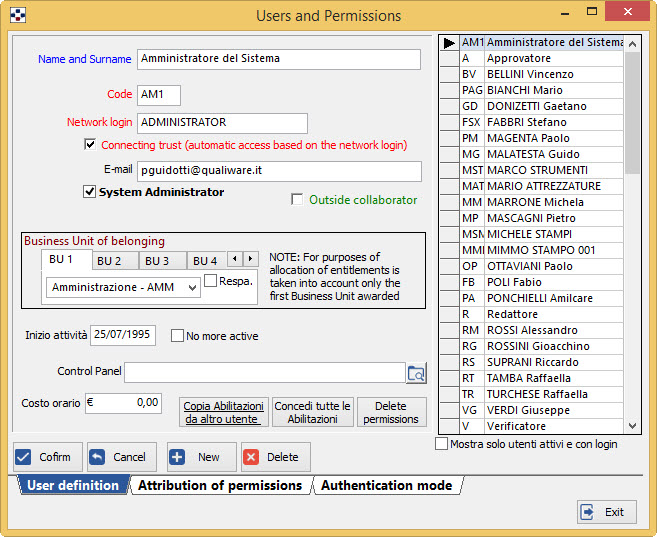
- Press the button “New” that allows the insertion of a new user data.
- Fill in the top section, stating: surname and name of the user, the code, which is preferably from his initials, login, that is the name with which the user logs on to the network, e-mail, E-mail address (report exactly the user address as this is defined in the internal mail system) and the Business Unit of belonging, chosen from the drop-down list.
- By checking the box “Trusted Connection (automatic logon based on network login)”, you make it possible the access of the user directly from the login of the network, without displaying the login window.
- If the user is a system administrator, specify it by ticking the box “system administrator”.
- In “Business Unit of belonging”, you can define, for each person, up to five units. Switch from one tab to another and in the drop down box choose the unit. To indicate that the person is responsible for that unit, tick the box “Resp.”.
- It is possible that a person is responsible for even more units.
- Only for documents, in the evaluation of the authorizations of a user to a category, (starting from rel. 2010.00 h) the program considers all units attributed to the same user, and not only the first, as was the case previously.
- If it is an external collaborator, specify it by ticking the box “External collaborator”.
- Indicate, in the homonymous field the Activity Start date.
- When the user ends its activity, tick the box “No more active” that will activate the field Activity End.
- The check box “Control Panel” allows you to assign each user a custom configuration of the Control Panel (see chapter Control Panel, section Customizing the Control Panel).
- In the Cost per hour field you can specify the hourly cost of each person;
This cost is used to calculate the cost of non-quality/quality and prevails over that reported in cost causal. It should be noted that the cost of various users is visible only by the System Administrator: each user sees only his own cost.
- The box at the bottom to Allow the access only to users with a defined password must be ticked if you want to restrict the access to the program only to users who have specified a password. This of course for reasons of security in data access.NOTE The program does not check the box if you have not defined a password for at least one System Administrator, otherwise there would be no longer possible to administer the system.
- By ticking the box Access via login, the access form is changed, because instead of the drop-down list containing all users enabled, a field is shown in which to insert the login name specified on this same form (Users and permissions). This allows you to log in using a QualiWare username instead of choosing the name from the drop-down list.
- The button “Copy permissions from another user” copies the permissions from one person to another: pressing it opens the list of users of the programme, which should be selected that whose qualifications you want to be copied.
- The button “Give all Permissions” assigns the user selected all possible permissions on each document type and registration.
- The button “Delete permissions” deletes all the permissions granted to the selected user.
- By checking the box “Show only active users with password” you can view and select the permissions only for users who are active (for whom, i.e., in the Staff data form, you did not specified an Activities end date) and that have a defined password.
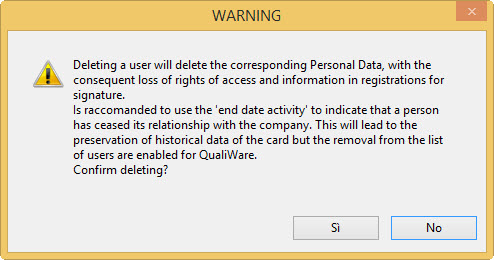
- If you wish to delete a user, press the button “Delete”.Important: you cannot remove the last System Administrator if it remained just one. Must be remembered that this operation should be carried out with particular caution, because of the consequences that entails. The program still presents a signal of dangerousness of the operation:
ATTRIBUTION OF PERMISSIONS
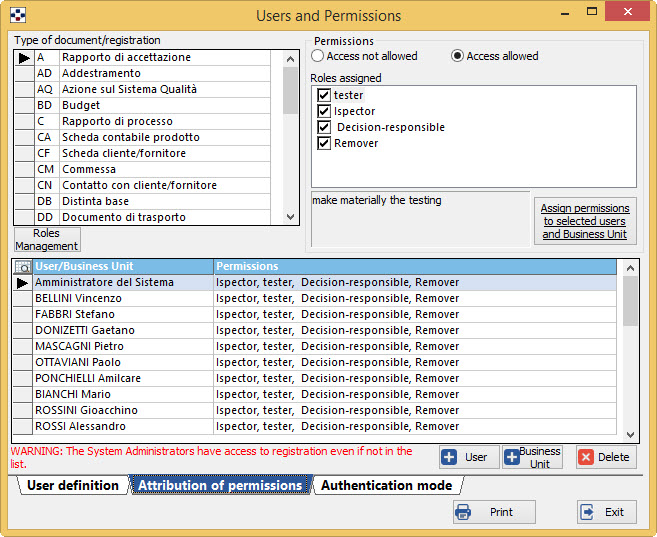
The table called Document/Registration type contains the list of documents and records maintained by QualiWare. The next section, entitled Permissions, contains the list of defined roles (see below) for each record (depending on the selected recording, change the type of qualifications) and enables users to defined roles, using the buttons: “Access not allowed” and “Access allowed”.
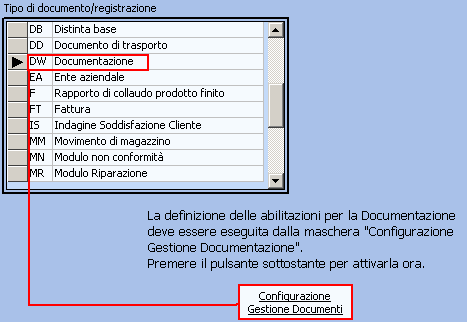
- Note concerning documents: it should be provided that in this form you define roles and attribution of qualifications only for registrations; for documents – Word Documentation voice – is shown a button to access a special form:
- Note concerning business units: in the list of documents/records of the table has been included a specific entry for Business Units, so you can adjust also the permissions to te units management. In this way, in addition to System Administrators, also other people, hereby expressly configured, can enter, edit, or delete business units:
DEFINITION OF ROLES
Before you assign users the permissions on documents and recordings, in fact, you should, if it is not already done, define roles for each record (as has been said, for documents, the definition of roles and enabling should be made elsewhere), i.e. functions to which users can be enabled.
To define roles, press the button “Roles Management” which will open a special window.
The roles defined for each type of registration are then listed in the section “Roles assigned”.
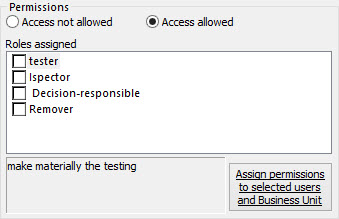
from which you can select those attributable to users involved, as shown below.
DEFINITION OF WORKFLOW STEPS
For some categories (Documents of course, but also Training Relations, Actions on Quality System, etc.) you can specify one or more workflow stages, i.e. the process of document production/recording that assume a verification and approval by a user.
The definition of the workflow phases related to documents is done from within the Documents Configurations form, with button“Defining Workflow Phases”, which opens a special window.
The definition of the workflow phases related to recordings, however, is made by here by pressing the button “Managing Workflow Phases”, which opens a special window.
Workflow Designer
The workflow on the recordings can be designed using a graphical interface easy to use and intuitive.
By pressing the button “Workflow Designer” opens the workflow management window as a flowchart.
ALLOWING USERS TO DEFINED ROLES
Intervention roles defined above must therefore be attributed to users involved, in order to accurately define the responsibilities and interactions.
Select from the table the recordings category for which you want to assign the ratings. Then:
- To allow only access in consultation to individuals or to units, press the button “User” or “Business Unit”: in the section Users/Units enabled appear references to people or institutions enabled with the initial specification only to enable consultation.
- To allow editing you must select the user or unit, tick “Access allowed” and, in the Assigned roles, tick the boxes relating to qualifications that you intend to give to the user or unit.
-
Press the button “Assign permissions to selcted users and Business Units” located under the list of assignable Roles.
NOTE: a breakdown of permissions for the Staff Data Management (in the list above with OS code Personal Form) is very delicate, because it regulates the access to personal data. It is important to know exactly the capabilities of each role, so as to attribute them properly. ![]() See the following Note for the allocation of roles.
See the following Note for the allocation of roles.
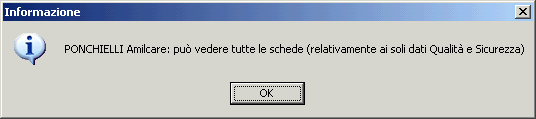
Limited to Personal Form, the programme offers a tool for verifying the functions for all users who have access to Staff Data Management form. By selecting each enabled user and pressing the button “Check”, the program shows the functions that the user is enabled.
Ex.
By pressing the button “Print” you get a grid that shows, for each registration form the distribution and the type of access permissions.
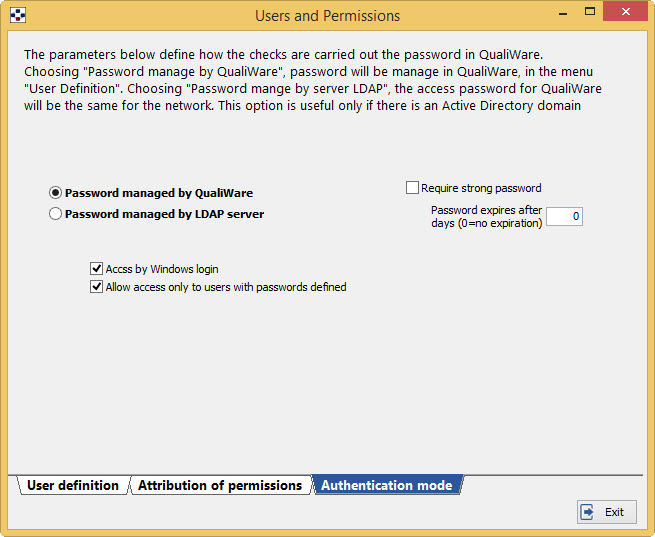
AUTHENTICATION MODE
This form allows you to define whether the access password must be entered in QualiWare or whether by an LDAP server, usually made it by a corporate domain server, and then a connection to Active Directory.
- Choosing the option “Password managed by QualiWare”, the program will be accessible with specific passwords, managed by Qualiware, witvh the possibility for the user to change them.
By the flag “Access by Windows login”, the user should authenticate inserting the username used for the Windows login.
Differently, the user can choose thw username by a drop-down list.
By activating the checkmark “Allow access only to users with passwords defined” the access to QualiWare will only be possible for the users for which a password has been inserted at the creation time.
From the release 2015.03b is possible to force the use of a complex password (box “Require strong password”), at least 8 characters and contain at least one uppercase letter, one lowercase and one number, as well as provide for the password expires, specifying the number of days of validity in days expire at the password. In this case, once elapsed since the last password change the number of days entered, the user will be presented with the password change request, with the requirement to enter a new
- choosing the option “Password managed by LDAP server”, the login credentials will be verified on the LDAP server that corresponds to the domain specified in the Authentication domain name.
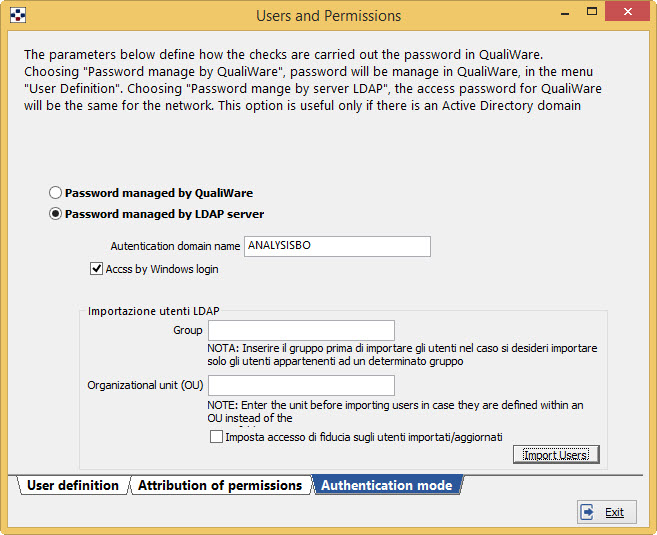
So you no longer need to define user passwords in QualiWare, but you will need to specify, for each user that has access to the program, the network login.
By checking the box “Access by Windows login”, the user should access to the program by the user name and password used to log on to Windows.
In the field Group you can specify a group name, other than “QualiWare” and defined in Active Directory, to select users to import.
It’s possible to import users from a group defined on a different domain from the main (as long as connected to it and accessible from the LAN) by specifying the domain name following the character “\” and the name of the group. Imported users will present, in the field Login, the membership of the domain name followed by their username.
In the “Organizational Unit (OU)”, you can optionally specify the Organizational Unit of the Active Directory from which you want to import users.
The button “Import users” allows you to import in QualiWare Active Directory users that not yet exist (the correspondence is established through LOGIN). Is shown a list of users (choosing between viewing them all or only those who belong to a group called “QualiWare”) from which you can select the ones you want to import. Important data are:
- Surname and name
- Login
- E-mail address
- By checking the box Sets trusted access on imported/updated users, the tick “Trusted Connection (automatic logon based on network login)” activates on every imported user in the Definition of users form
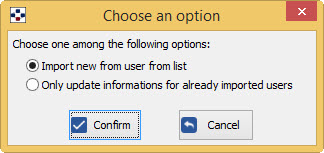
When you press the button “Import Users”, the program offers the following alternatives:
-
import users from complete list
-
just update the users data already present.
After pressing the button “Confirm”, the program offers the possibility to choose whether, in the importing, first assign the surname or first name of the user.