This form allows you to record reports, complaints or communications of appreciation coming both from within the company and from the outside, especially from private entities, so you can record all the details of reports and can manage to improve practice and satisfaction of customers/users.
The form looks can be divided into two parts: one to record the report/complaint (at the top of form) and one for the management of the response (in the bottom part).
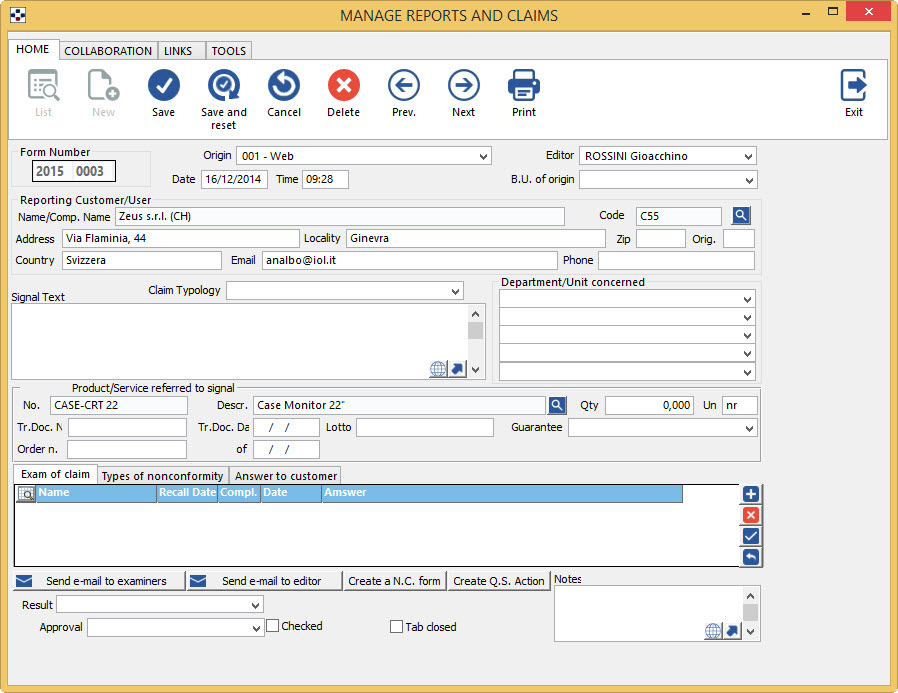
RECORDING OF A REPORT OR A COMPLAINT
- Confirm the Form Number which is the first available code that shows up. If you want to try a form already created, use the search button
 .
. - Indicate the Origin of the report: you can choose between drop-down box: Web, mail and phone call (options presetted in “Manage parametric strings”, in SRPRO Origin Report/ Complaint).
- Also specify Date and Time .
- The Editor is automatically compiled with the name of the program’s user. If you want to change it, you can choose another name among those enabled, after inserting the password.
- Then compile the part about the “Reporter”:

- If the “reporter” is a company’s customer, you can retrieve from the archive using the search button in the field Name/company name or from the Registry Code. In addition to selecting a customer/user from the archive you can add a new code: the button which opens the list of customers, on this form opens a special window.
- If the “reporter” is external, and tou don’t want to encode it, type his name and surname or his company name.
- It is possible to define a Claim Typology, choosing between: critical errors, unbecoming behaviour, important failure (but can be encoded other different in parametric string Management, with code SRTIP).
- In the Notes field Signal Text, insert a detailed description of the complaint.
- Specify the product/service reffered to report: this can be invoked from regsitry product or it can be an external element, which is shown directly here. But it can also be a product that you want to encode directly from here. This is possible by pressing the search button which, in this tab, opens a special window which allows to encode extemporaneously a new article.
- About the product or the service you will have to specify the Qty (quantity subject in the report) and the number of the lot; the Un (unit of measurement) is automatically inserted from the registry.
- References of the transport’s document, ddt number and ddt Date are optional.
- It should also be specified the warranty Type: also can be chosen from a preset list, in “paramentric strings management”, with SRGAR code. Are already coded the following types: under warranty,Not under warranty, warranty granted.
- Eventually, also indicate the Department/Unit concerned, by choosing it, by search button from the Registry of internal departments. You can specify up to five departments or units concerned. As for the customer reporting, also author for the Department or unit concerned can, if necessary, create from scratch a code from here. The search button it opens the following window.
- Finally, the editor insert a report’s approver (choosen between enable users for) in the Approval field .
MANAGEMENT OF THE RESPONSE TO THE CLAIM
Examination of the claim
The complaint examination section is presented as a table, in which you can define one or more examiners involved.
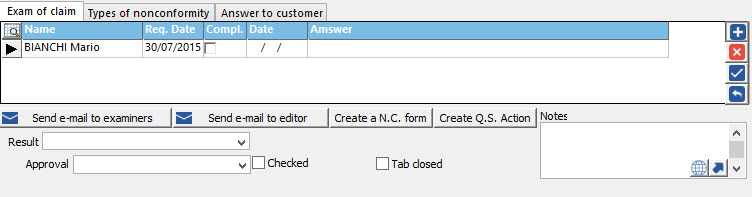
- The button
 opens a line to insert the Name of the examiner: the program opens a list of examiners available (who have the possibility to verify the clams/reports, in “permits and authorisations”).
 - In the req. date the editor can specify a date by which the examiner needs to complete its evaluation.
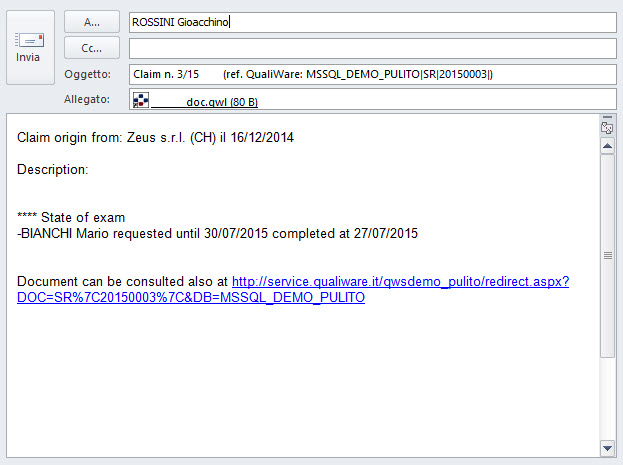
- After defining all necessary examiners, the editor can send a mail to examiners themselves: by the “Send E-mail to examiners” tab; it will automatically create a message that contains: the number referenced to the complaint in question, a link both to claim form (in pdf format) and the same form that can be opened by the recipient of the mail already in writing and the following default message “An exam of referred claim is requested. The descriptive sheet is attached”.
- The examiner, once completed the examination will be able to:
- insert the mark Compl. (completed) to the box;
- indicate the Date on which the examination was completed;
- Insert a synthetic text of Answer .
- Then every examiner can send to the editor a message that signals completion of its activity, by pressing the button“Send Email to the editor”. The message that you will create will contain a brief summary of the status report on the subject (including the link to the tab):
- Once you have verified the examination of all examiners involved, the editor can define the reporting result: Approved or Rejected (in “parametric strings Management”, in SRESI, also code can be set different options).
Types of Non-conformity
- To register a non-compliance related to the reporting object, press the button that inserts a row into the table.
- Then, with the button “NC Types“ can be opened the list of non-conformities, from which to choose one that interests you. The program will report in full table row N°, Description and Type (the type of the N.C. was assigned in the settings tab types of Nonconformity).

- To delete a non-compliance submitted before it is confirmed, use the button
 ; If you have already confirmed, delete it with the button
  .
. - It is also possible to create directly from here a Nonconformity or Preventative or corrective action, respectively with the buttons “Creates N.C. Module“ and “Creates Q.S. Action“.
Customer response text
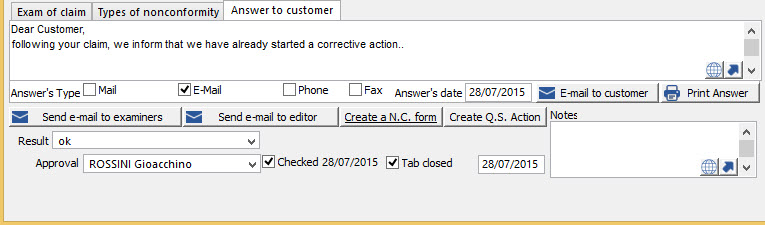
- The following section contains a Notes field to make in the text of the response to send to the “claimer”.
- By
 you can be maximized and formatted Notes field as you wish (with html formatting).
 - Define how you send the reply: “mail/E-mail/Phone /Fax .
- If you choose e-mail, can be set the mail directly from here, pressing the button “E-mail to customer” will open a message containing the date of the report effected by the customer or the user and the text made.
- If you choose mail, using the button “Print answer” can be launched the text of the response.
- The Responsible must tick “checked on..”, so it shown that is taken vision of the.
Approval and close the report
The responsible (who the editor had choosen as responsible for the Approval) must finally tick “Checked” next to his name. And then it will appear Approval Data.
To close the report, after the text of the reply has been posted to the customer/user, select the check box “Practice closed“.