THE CLASSIC PANEL
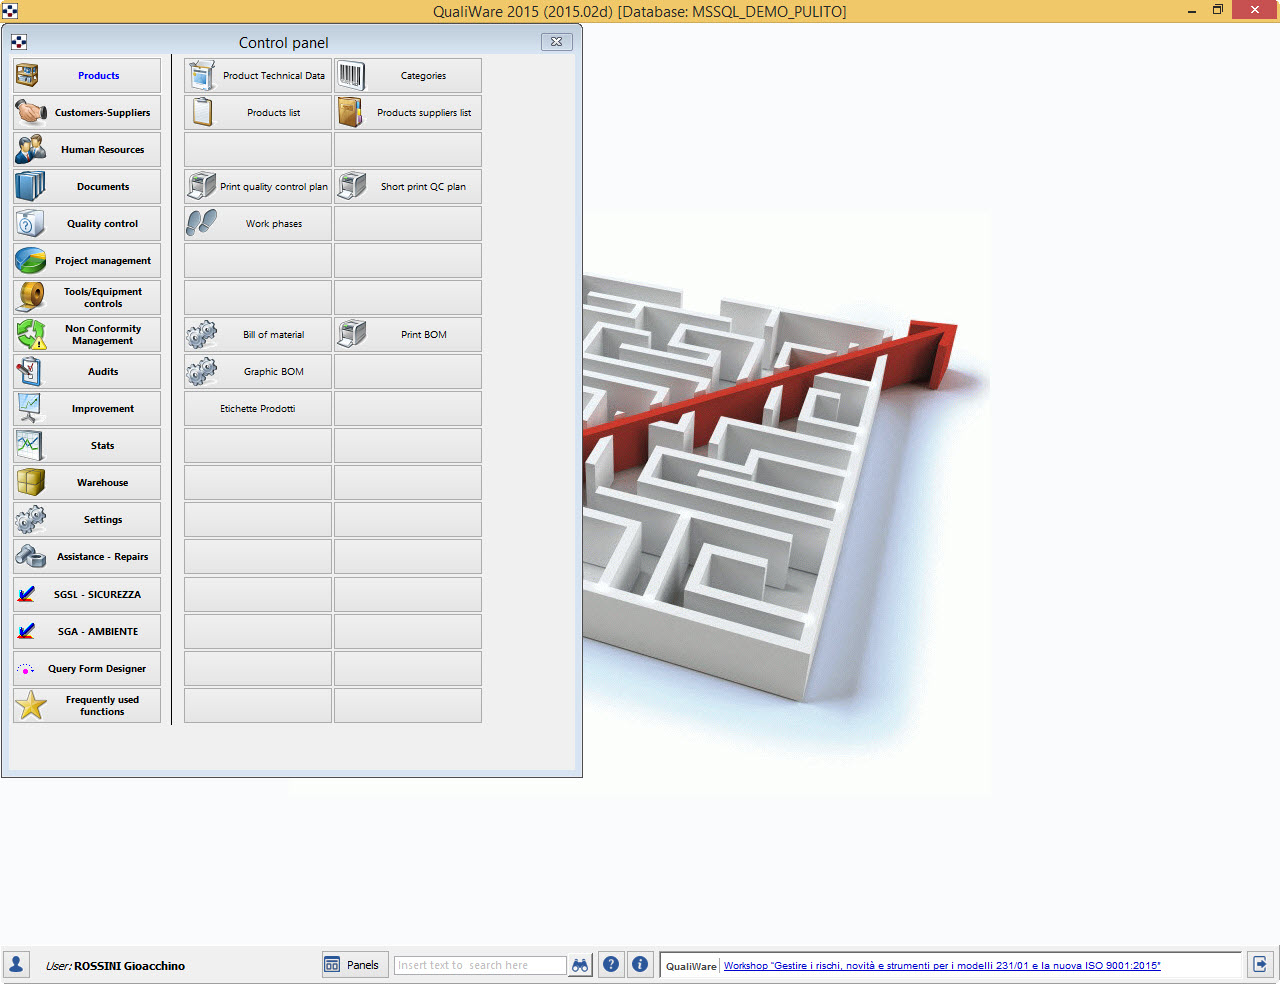
When QualiWare starts, the Control Panel is shown as in figure.
In the lower right is the direct link to the News page of the QualiWare website.:
![]()
That view is deactivated centrally by using the Management Console in the “General Settings”.
Left buttons are modules (macro functions) of QualiWare: each of these main buttons enable, on the right side of the Control Panel, the buttons relating to specific functions.
The button “Frequently used functions” varies continuously its secondary buttons, updating them on the basis of the use made of the various functions of QualiWare, so submit those most used by each user.
![]()
The small button next to the name of the user, allows you to change the user without leaving QualiWare: pressing it, in fact opens the following window:
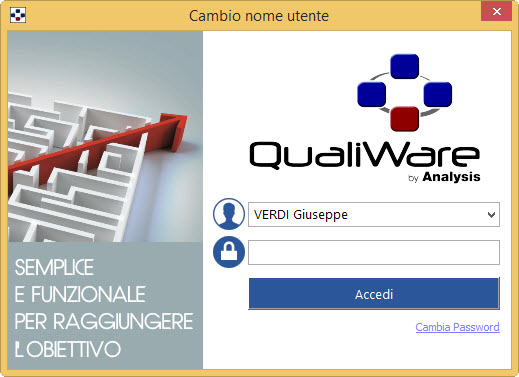
Choose the user name with which you want to enter. Of course you must know the password.
NOTE Username change should be done only when absolutely necessary, since any intervention on the program will be registered under the name of the current user. Therefore, this operation should be expressly authorized by the user itself on whose name you want to enter the program.
THE PANEL MENUBAR
At the end there is a panel with a main menu bar:
![]()
-
On the left is the name of the user who accesses the QualiWare. With the
 button you can enter QualiWare as another user, after entering password.
 -
The button “Panels” allows you to add more panels to those standard of the buttons and of the documentation.
-
The
 field next to the Documents Search button allows a quick search for a word or string within all categories of documents, writing them directly there. The result is then displayed in the usual form of Documents Search.
 -
The button
 opens the following menu:
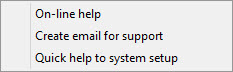
- When you click On-line help, you open the online Help of QualiWare.
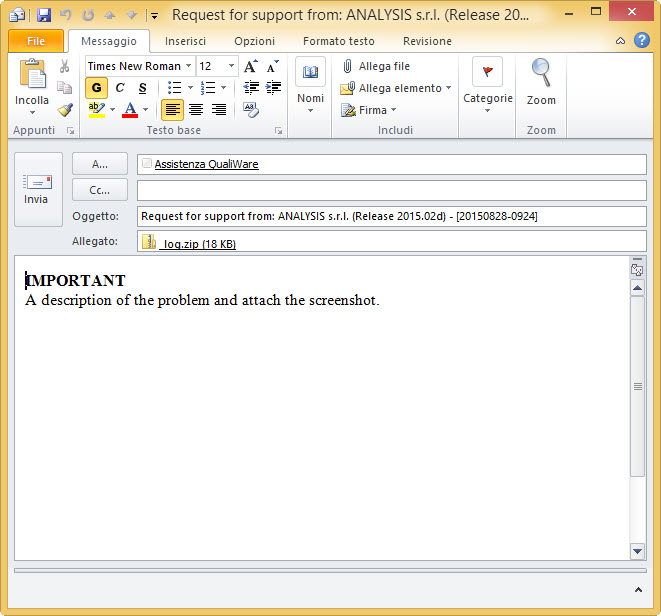
- Choosing Create email for support for assistance, opens an email already set with the data needed to open a ticket at the QualiWare Help Center:
- By choosing Quick Help to system setup, opens the Word file with the guidelines.
- Pressing the button
 will open the form with the basic system information:
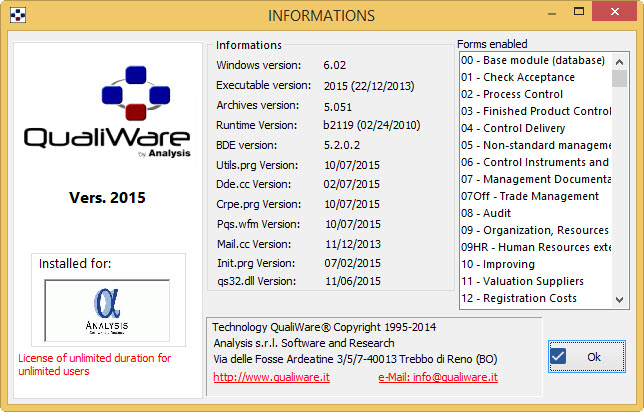
CONTROL PANEL CUSTOMIZATION
QualiWare Panel can be customized in three ways:
Creating a dashboard
- First of all, save the original configuration, so you can return to it at any time:
- Open the menu of the right mouse button and choose Save panel configuration to file. The following window will open:
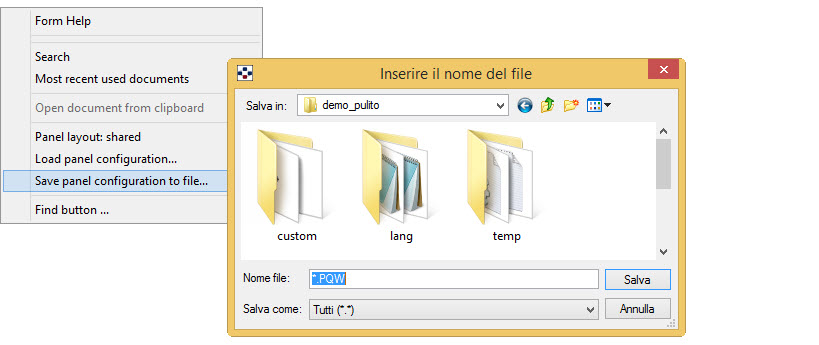
- give it a name, for example STANDARD.
- Next, you will customize the Panel, according to your needs, as described in the previous paragraph.
- Save new settings by opening the menu of the right mouse button and choosing – as above – the entry Save panel configuration to file.
- Give another name to the new configuration.
In this way you have created two parallel Control Panels. If the creation of alternative configurations is permitted only for the System Administrator, the users can load any configuration they have created. In order for a user to always open a particular setting of the Control Panel, go to the Configure Users and permissions, select the user’s name and give it a Panel configuration, by choosing from the .PQW file field, all saved panel configurations.
SETTING A DEFINITE PANEL
You can upload a specific panel already created:
- Click on the background of the Panel with the right mouse button and, in the menu that comes up, choose:
- the function Load panel configuration: shared to load the standard Panel common to other users;
- the function Load panel configuration… to open a custom panel;
Quick Panel customization
You can quickly customize the Control Panel, using the drag and drop feature from the Feature Tree:
- The menu button “Panels” select Feature tree.
-
In the Feature tree displayed, open the macro function you want, pressing with the mouse pn the tree node showing the sign +.
-
Choose the function you want, align it with the right mouse button and drag it onto one of the blank buttons on the Control Panel.
-
NOTE This way you can customize only the secondary buttons, i.e. those on the right.
- To remove a function from the button, point the mouse on the button, press the right mouse button and choose Delete definition.
You can also move, directly on the Panel, secondary buttons by dragging.
CUSTOMIZING BUTTONS
To customize any Control Panel button, simply press the right mouse button and choose the menu item Customize button: the customization window is slightly different depending on whether you’re looking to customize a primary or a secondary button:
A] Customizing a main button
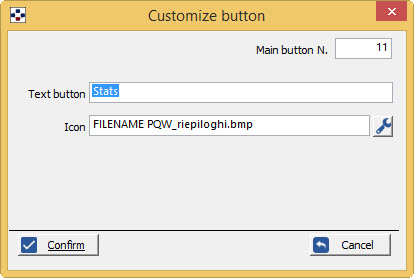
The number in the upper right corner identifies the button you are customizing and is not editable. What you can customize are:
- the text or title of the button;
- the icon, that with the button
 can be chosen inside a default catalog, both outside.
B] Customizing a secondary button
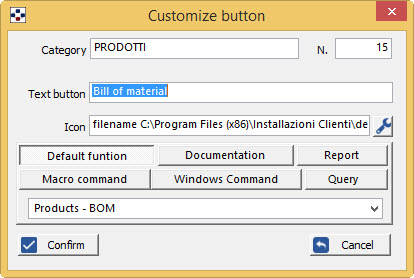
The Category is already identified by the program, depending on the primary button enabled; the number refers to the button that you are customizing.
- In the keypad choose the type of function you want to link to the button: can be:
- one of the default functions,
- a category of documents,
- a report,
- a macro,
- a Windows command.
- a query.
- If it is a Default function, the button
 opens the list of all functions of QualiWare.
 - If it is instead a Documentation, Report, or Query, with button
 opens the file selection window.
In particular, in the case of Documentation, you can choose both a normal documents categoryand a fictitious category to be assigned to the custom button: in this case, pressing the button, will open the tree portion that belongs to the selected category.
- Finally, if it is a Macro Command or a Windows Command, must be report the same command.
for ex: “do ELDOCSPE.WFM”
- NOTE You can customize a button to let him activate a mask of the web version, without being prompted to login or to allocate a new license: in the Macro Command, enter the name of the web page corresponding to the forms that you want to activate.
for ex: “PERSON.ASPX”.
- Give a title to the button (Button text).
- Optionally choose an Icon you want, by opening the list with the button .
- Confirm and exit.
C] Changing the number of panel buttons
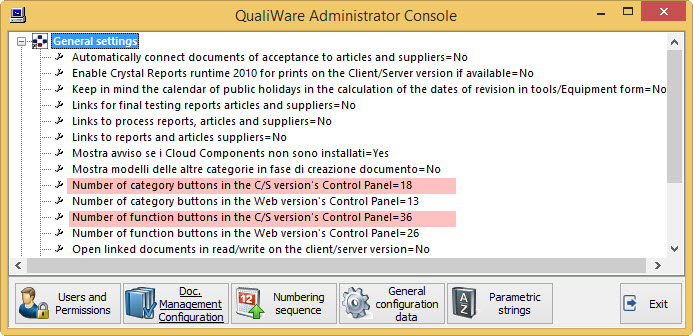
You can reduce or increase the main or secondary buttons of the QualiWare Panel, using the function Configuration – Administrator Console: in General Settings, there are two specific entries that allow you to define the number of buttons you want.
D] Deleting a secondary button
You can also delete a button, opening up the Menu of the right mouse button from the button that you want to delete and selecting Delete Definition.
E] Search a button
In the menu that is activated by right-clicking on a – main or secondary – button on the Panel, there is the Find button that allows you to search among all the control panel buttons active those that contain a specified string.
DOCUMENTATION TREE
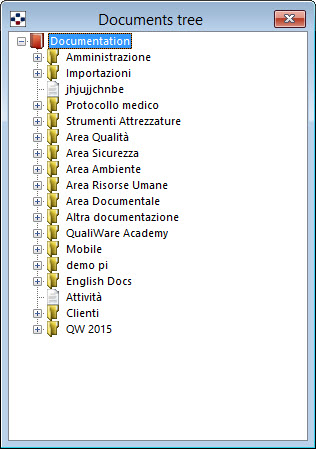
The Documentation Tree panel, normally visible beside the classic Panel with buttons, show in the tree form of all the documentation as configured in QualiWare.
You can configure the documentation tree directly from here, without having passed on the “Document management configuration” in the Control Panel via contextual menus or graphically using the mouse.
NOTE However, these functions are permitted only to those who own the rights to the System Administrator.
When you try to open a document from the Document Tree (with the custom fields configuration you can articulate the tree to the individual documents), the program offers two possibilities:
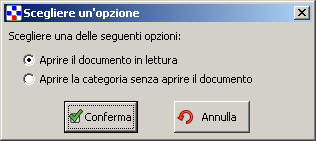
By clicking on the first option opens, in reading, the single document. Clicking on the second opens the documentary category and not the individual document.
Context menus tree
General menu
Pressing the right mouse button from the “Documentation” header at the top will open the following menu: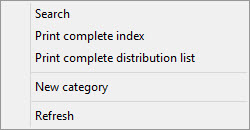
- The voice Search opens the form of Document Search.
- The entry Print complete index launches index printing of all the documents in the archive.
- The voice Print full distribution list launches the print of the distribution list for all the files in the archive.
- The voice New category opens the form of Documentation Configuration and inserts a new row in the list of documental categories of the first level (in this case, dependent categories are not displayed).
- The entry Update revises the tree as a result of any changes in its configuration.
Fictitious categories menu
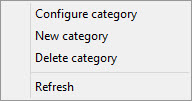
If instead of from the header at the top, press the right mouse button from a fictitious documentary category, a different menu pops up:
-
The entry Configure category opens the Configuration form limited to the selected category.
-
The item New category open the form of configuration related to the fictitious category selected, with the list of categories that depend on it, in which has already been inserted the new row for the creation of the new category that, of course, will depend on the same fictitious category.
-
The entry Delete category remove from the tree the fictitious category and all categories dependent on it.
-
The entry Update revises the tree as a result of any changes in its configuration.
Normal categories menu
By pressing the right mouse button on one of the regular categories not fictitious, you open the following menu: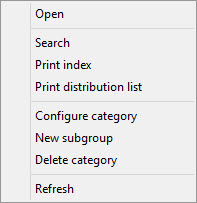
-
The entry Open folder opens directly the management form of the selected category.
-
The voice Search opens the Documents Search form for the selected category.
-
The entry Print index opens the print of the index of all documents for the selected category.
-
The voice Print dristribution list opens the print distribution list for all documents in the selected category.
-
The entry Configure category opens the tab of Documentation Configuration only for the selected category.
-
The voice New subgroup open directly the definition of subgroups for the selected category.
-
The entry Delete category clears the selected category tree.
-
The entry Update revises the tree as a result of any changes in its configuration.
Graphical navigation functions
Only the System Administrator can change the configuration of the tree graphically, using just the mouse: in fact pointing the mouse out of a category, he can move it within another category, or from within a category bringing it directly into the main tree.
He cannot move it just above or below.
ADDING PANELS
The button “Panels” activates the following menu: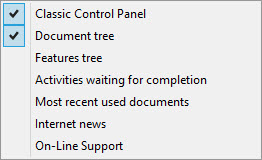
Each menu item opens a special panel that can always be kept open in the personal configuration of the Panel. If you do not want to display a certain Panel, just remove the check mark.
Feature tree
Show in the form of a tree, all features found in QualiWare, with the possibility of searching and opening a selected function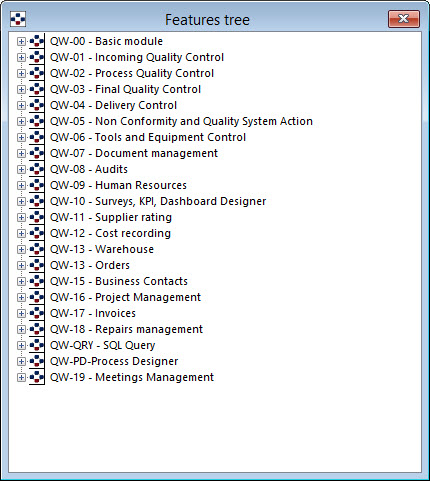
From the Feature tree you can customize the Control Panel, by dragging the functions with the mouse.
Internet news
This Panel connects to Analysis website, to the news page; can be kept open if you want to be informed about new Analysis products.
Pending activities
This panel allows you to keep the documents and records for which interventions are expected, already expired or expiring. The user sees displayed documents or recordings that require his intervention (verification, approval, review) or those that, written by him, require the intervention of another.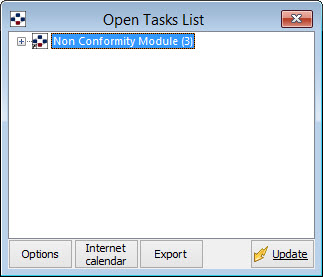
OPTIONS
The user is free to define the view mode, pressing the button “Options” that opens the following window: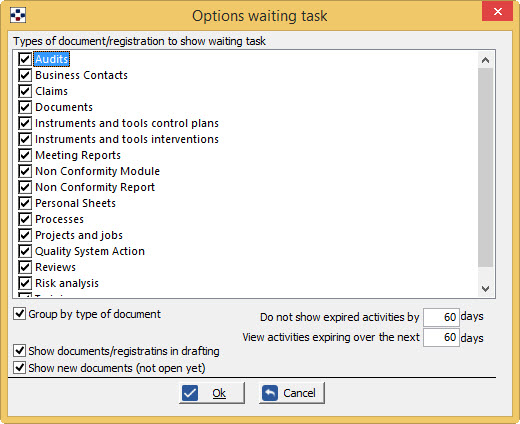
- If you do not want to see the deadline of a particular recording, remove the check from the list.
- The program groups by registration type and documents. If you don’t want to group, but see the list of all the documents and recordings simply divided into <Expired> or <Without a specific expiration date>, remove the tick from “Group by document type”.
- Unchecking the box “Show documents/recordings in editing” you won’t view those documents on which the editor is still working and for which therefore has not yet started the workflow.
- By removing the check mark from “Show new documents (not yet opened)” you won’t view the documents received in distribution and not yet open.
It is then possible to define the time limit:
- before which do not view expirated tasks: “Do not show expired activities by.. days”.
- within which to view expirating tasks: “View activities expiring over the next..days“.
Once you have defined the desired display options, press the button “OK” and, returned to the pending task panel, press the button “Update“ and wait until the program has finished updating. The same button must be pressed even if you have made interventions on documents or records and you want to recalculate the deadlines.
NOTE The update is not automatic, to avoid excessive delays in the opening of QualiWare. It is launched with only a press of the button “Update”. In the QualiWare Server Daemon configuration form has been added the tab “Update pending tasks” that allows you to configure the frequency with which a server update is done for pending tasks for each user.
Between tasks related to staff, in addition to trainings, you will also view other deadlines: passport, driver’s license, residency permit, medical visits, PPD delivery, skills, contracts, etc. This information, however, are available only to the user who has the role of Full Staff data Management and Quality and Security Data Management (with the exception of deadlines on contracts that are visible only to the first of the two roles).
CALENDAR SHARING
The button “Internet calendar” is visible only if you have installed QualiWare Web Server.
In the client/server version, pressing that button is activated immediately Microsoft Outlook (or default calendars manager) and is automatically subscribed the QualiWare calendar.
EXPORT
In the Panel there is also the button “Export” that allows you to export to Excel, the list of pending tasks.
The program anyway has a management system of automatic reminders via e-mail that automatically informs users about the expiring tasks.
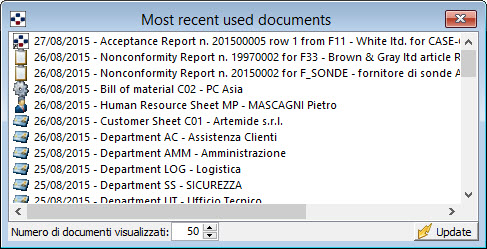
Documents/recordings most recently used
This panel allows you to always keep highlighted the last documents and recordings opened or edited. To refresh the list, press the button “Update”.
On-line Support
This panel allows you to automatically connect to the Analysis online help, showing immediately available technicians.
Each of these panels can be moved and resized as desired, in order to save a custom panel configuration according to your needs.
SPECIAL FUNCTIONS OF THE PANEL
Opening a document or recording from an email
You can retrieve a document or registration very easily even if the mail client is outside the virtual terminal session, i.e. If the message attachment is present only as a reference.
- copy to the Clipboard the email subject (which must contain the words ‘ Ref. QualiWare……”);
- click with the right mouse button on the control panel of QualiWare;
- choose the menu item Open… with reference to the subject line of your email.
Link to one of the functions of the Panel
You can copy the link to one of the side buttons on the control panel.
- Open the menu with the right mouse button from the left panel.
- Select Save link to function which will open the window for selecting the location.
- For example, if you save the link on your Desktop, you can launch that QualiWare form right from your Desktop.
FORM MENU
Each form has a menu with specific features.
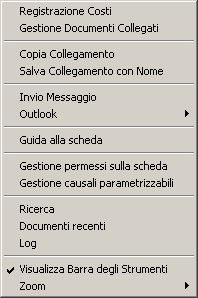
The menu can be activated by pressing the right button of the mouse on any point of the form, but can also be kept highlighted with a toolbar:

The bar can be disabled by opening the form menu (by pressing the right button of the mouse on any point of the form) and unchecking the menu item “Show toolbar”. The setting is retained in subsequent openings.
Meaning of menu items
- Costs registration: opens the costs registration form for the selected object.
- Linked documents management: opens documents list linked to the recalled object and allows you to create new links.
- Copy link: allows you to copy in the Clipboard the link to the document/registration opened, in order to paste it into Linked Documents of another object.
- Save link as: allows you to save the link to the document/registration opened in a directory (as .qwl, can be opened from the internal client in the virtual terminal session).
- Send message: opens the Outlook or Exchange mail (depending on the application you installed on your system) to send preset messages from the program relating to the subject matter.
- Outlook: opens a second menu “Create Activity /Insert in the Calendar”, from which you can make Calendar Appointments or Activities. In particular, if you open the Outlook menu placed on a date field, creating calendar entries or activities will take place carrying the date contained in the same field.
- Form guide: opens the online help on the form itself.
- Form permissions Management: opens the permissions attribution form regarding the type of recording you are using; If you are on a documentation form, will be opened the permissions attribution form in relation to genereic Word documentation: from there you can then move into permissions management for individual categories of documents.
- Parameterizable Causal Setup: opens the Parameterizable Causal Setup form, only on causal defined for the form itself.
- Search: depending on whether you are on a form of documents or of quality recordings (non conformity modules, audits, etc.) the command opens the Documents Search form or the Records Search form.
- Recent documents: opens the list of the last thirty open documents (NOTE both documents and recordings).
- Log: opens the Summary window of the events related to the document/registration in object.
- Zoom: allows you to enlarge the size of objects and characters on the mask; zooming only applies on the form from which it is made.
- Show toolbar: If strikeout has always enabled the toolbar that contains the menu functions.
Meaning of the icons in the STATUS BAR

Not all icons are available on each form; It may happen that someone is disabled because it is not compatible with the function of the form.
 : activates the workflow management form:
 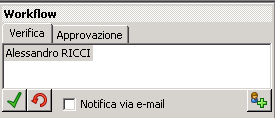 NOTE The System Administrator can, by opening the workflow manager window, choose to activate it on that mask for all users, without they can remove it.
 : activates the window of pending recordings related to the form from which you press the button (for example, if you are in Non-Conformity Modules management form, the following window will pop-up:
 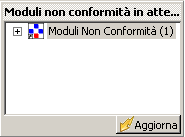 .
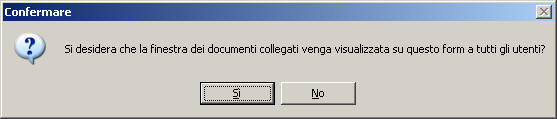
. : opens the list of documents in keeping it highlighted. NOTE The System Administrator can, by opening the list of documents, decide to activate it on that mask for all users. He was presented the following question:
answering yes, all users will see the linking documents window window without they can remove it.
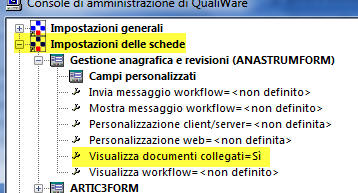
To give the opportunity to the individual user to choose whether or not to display the Linked Documents in Administartor Console – Form Settings, must be set the function <not defined> in the option View linked documents:
 : opens the summary screen of the interventions on document/registration in object.
 allows you to save, in the linked documents, a PDF version of the module in object. This function is active for most of QualiWare registration modules in order to allow an easy management of the various versions of the plans themselves.
-
 opens the Search recordings form.
 -
 opens the Costs registration form.
 -
 allows you to copy to the Clipboard the link to the selected document or to the opened form.
 -
 allows you to save in a directory the link to the document or to the form.
 -
 automatically creates an e-mail message offering the choice between (respectively for records and documents):


-
The first option is to send the traditional message with an attached QualiWare link.
-
The second option allows you to send a message with the attached PDF print of the registration, or, in the case of document management, the original file.
-
The third option is similar to second with, attached to the message, linked documents (files only) in one zip file.
-
 automatically creates an Outlook task, which contain as subject the refernce to the file or to the form.
 -
 automatically creates a Calendar appointment related to the file or to the form.
 opens a sub menu with the ability to open a) the form guide b) the related functions broken down by type:
 .
. -
 invokes the Control Panel.
 -
 opens the link to the Analysis Technical Support via WEB.
 -
 allows you to change the zoom of the window display.
OVERVIEW OF GRIDS OR TABLES
Table or grid means any QualiWare mask that shows an outline of rows and columns.
Grills and tables can be opened from the Panel buttons or from inside the forms or from the button![]() that opens the archive under the field from which is pressed; in this case they are exactly Search lists that have their own peculiarity, ordering (see section below) and the resizing of columns (see section below).
that opens the archive under the field from which is pressed; in this case they are exactly Search lists that have their own peculiarity, ordering (see section below) and the resizing of columns (see section below).
Specific table menu
From each grid you can open a specific menu
- or with the button
 in the upper left corner of the grid
 - or with the menu of the right mouse button, that must be hold on the gray column on the left of the grid
Note: Sometimes, if you click the right mouse button on a grey part of the form, you activate a different menu, specific of a table or field. However, in this menu is present the voice Form menu, choosing which the grid menu will be activated.
Depending on the type of table, the menu items may vary (for example, the documentation tables also report all entries related to the processing of documents: Write, Read, Publish, Undo Publishing, Undo Revision, etc.). Entries that are always present in any table, are:
- Form guide: opens the online help for the form you are using.
- Form menu: opens the contextual menu to the form.
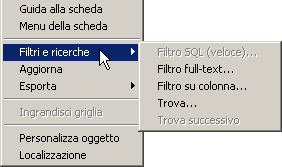
- Filters and search: this function opens a submenu with search functions:
- SQL quick Filter: (not available on all grills) performs a filter of the rows of a grid based on the search for specific text in any column of the database table to which the display is supported. The fields in which search is performed may not match those displayed in the grid. The filter uses the SQL server language and is therefore particularly fast.
- Full-text Filter: performs a filter for rows in a grid based on the search for specific text within any displayed column on the grid. This type of filtering, which is always available, is not particularly helpful as it involves downloading all the rows on the local PC and the next filtering using your PC resources.
- Find: searches not only on the first few characters, but also within the text on all columns. Does not consider dates or numbers.
- Find next: this feature (which is only active after you have once used the Find function) allows the search for subsequent occurrences of a string already entered.
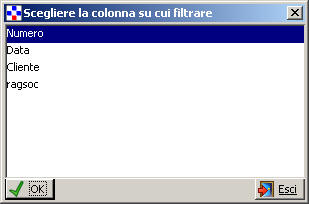
- Column filter: allows you to filter on a specific column. Filtering is case insensitive and is related to the presence of the string entered in the first part of the field: NOTE The search only returns equal values: lines that begin with the string entered for the search but they continue differently are not returned. Choosing this option opens a window to select the field that corresponds to the column in which you want to search for.
- Update: also this function is characteristic of grids and allows you to update the grid relating to any changes made by other terminals.
- Export: you can export the contents of the table in Excel or Openoffice.org CALC
- Enlarge grid: this feature allows you to extend a table, so that it fills the available space on the form in which it appears. Once the table is maximized, the menu item changes and looks like “Reduce grid“. The same effect as enlargement/reduction, however, can be achieved by double clicking on the table header.
- Customize object: opens the form that allows you to customize an object.
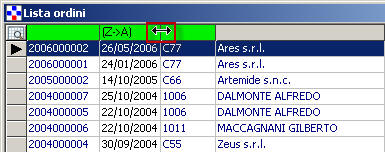
Sorting of Search Lists
All grids that open with the search button (![]() ) can be sorted on columns that have the green header:
) can be sorted on columns that have the green header:
In this example, you can sort by order number, date, customer code, but not by company name or by status.
To order, simply double-click the column heading:
- the first time that you double-click, is set in ascending order:

- the second time that you double-click, you set the sort in descending order:
 .
.
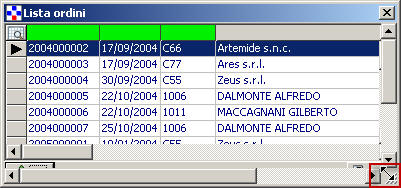
Resizing columns of search lists
It is possible to change the width of columns in search lists. The change is stored, so that it is reapplied the next time you open it.
- Point your mouse to the right of the column that you want to modify; the pointer changes into a horizontal double-headed arrow
- Move the mouse to the right (to enlarge) or left (to narrow)
Of course, changing the width of columns, you may also need to vary the size of the grid; This is stored for later reopening.
- Point your mouse to a corner of the grid; the pointer changes into a diagonal double-headed arrow.
- Move the mouse in the bottom-right (to expand) or on the top (to restrict)
SPECIAL FUNCTION BUTTONS
- <F1> BUTTON: activates the QualiWare Online help relating to the open form from which the key was pressed.
- <F2> BUTTON: activates the list related to the selected field. To restrict your search, you can type in the field he beginning of the text (word or number) and press <F2>: you will get the list starting from the first word or from that first number.
- <ESC> BUTTON: exits the card, but, unlike the button Exit does not store the data entered.
Notes fields buttons
In many quality documents and recordings there are the Notes Fields: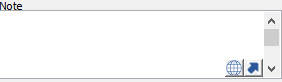
This is a very broad field that can be used for notes. Can be enlarged using the blue arrow.
The ![]() button instead permits to select the input language.
button instead permits to select the input language.
Once extended the notes field, shows a window with HTML text editor: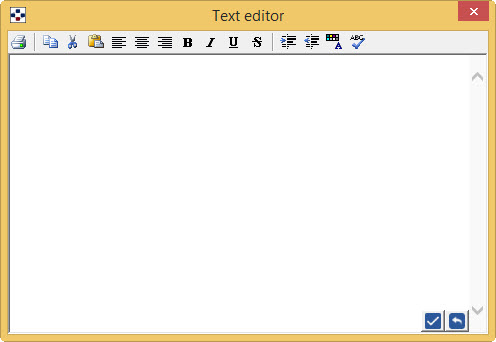
The Notes field is therefore freely formattable as style, font, font size, color, etc.
With the ![]() button you can save the text that is written in the same field, while the
button you can save the text that is written in the same field, while the ![]() button you can cancel the all.
button you can cancel the all.
Note: when the Notes field is not editable (it is seen by the cursor dashed), when the copy function doesn’t work with CTRL-C; then to make the copy you need to select the context menu item “copy” with the right mouse button.
Note: the formattings relating to text indents and bulleted and numbered lists are not supported in the prints.
BUTTONS IN THE PRINT PREVIEW WINDOW
When you request a video preview of the print, this will be shown in a window, at the top of which is a toolbar with several buttons.

The following are the functions of each button:
On the right side of the toolbar, lists the records that are displayed in the total, and the proportion of processed.
 First page
 Last page
![]() Previous page
Previous page
![]() Next page
Next page
![]() Indicates the current page number, compared to the total of pages in the document.
Indicates the current page number, compared to the total of pages in the document.
 Allows you to search for any word within the entire report.
 Allows you to choose the zoom value with which to display the page.
 Send the print command that opens a window in which you require the number of copies and page range to print.
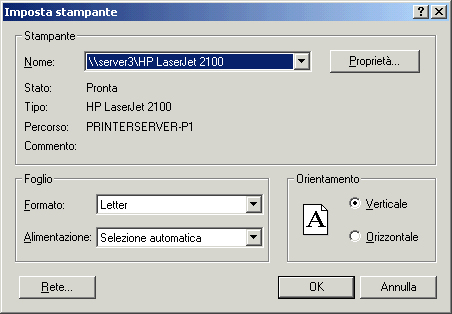
 Allows you to configure the printer to use.
 Exports the printing to a file on which you can specify the format (Word, Excel, Lotus, etc.).
 Allows you to send the report directly via fax. Is necessary that the fax is defined as printer in the Printers Setup form.
![]() Prepare a message with Word or PDF export in choosing the report as an attachment.
Prepare a message with Word or PDF export in choosing the report as an attachment.
 Allows you to refresh the report if you made changes after it had already been opened.
 Enables the displayed data tree view:
This column (which appears to the left of the print) shows the index of the elements on the basis of which the data is grouped in the same print. If the element shows a  means it contains another index of elements. By clicking on the + open the sub-index, from which you can select various records. By clicking on the main element, the program performs a so-called “drilldown”, opening a main sheet next to preview that displays only the contents of the item, without headers.
The processes prints previews and in the GANNT diagrams related to the design are different. They don’t have the toolbar above, but only the small button  that opens the printer configuration window: